Tuesday, March 24, 2015

3/7/15

I showed the students a couple techniques on how to make different textures with watercolor.  The first one we did was with salt.

Then we used plastic wrap on watercolor.


I also showed them how to do texture rubbings with crayon.


  They used these scraps to cut out their animal and then they glued them in to their landscape.  We decided to display their works in the hall for their final presentation.


Utah Animals and Textures 


Subject Concepts
Art Concepts
Content Covered: Animal Identification/Classification


Content Covered: Texture and mixed media techniques
State Standards & Objectives (USOE/UEN):
Standard 5, Objective 2
a.     Identify common plants and animals that inhabit Utah's forests, wetlands, and deserts. 
Standard 5, Objective 3
b.     Use a simple classification system to classify unfamiliar Utah plants or animals (e.g., fish/amphibians/reptile/bird/mammal, invertebrate/vertebrate, tree/shrub/grass, deciduous/conifers). 


State Standards & Objectives (USOE/UEN):

Standard 1, Objective 1
a.     Use value, color, and texture to create interest. 

Learning Outcomes:
      The student will be able identify Utah wildlife and their physical characteristics. 
Learning Outcomes:
     The student will be able to explore different mediums and processes to create a variety of textures. 
Lesson Plan

Objectives:
Students will practice classifying and identifying Utah animals.  They will paint and draw a specific Utah animal multiple times by using a variety of techniques to create different textures.  Students will experiment and become familiar with different texture processes. 

Assessment:
Students will use a worksheet to practice classifying/ identifying their neighbor’s animal.

Students work will be used to assess students ability to create a variety of textures.  
  
Materials Needed:
  • Crayons or oil pastels
  • Paper
  • Scissors
  • Watercolor paint
  • Brushes
  • Paper clips

Lesson Sequence:

  • Have students read animal descriptions again.  This time they will highlight the physical description of what the animal looks like.  (5 minutes)
  • Have students play eye spy game to classify their animal (10 minutes)
  • Have students sketch out the basic shape of their animal.  (10 minutes)
  • Have them cut out the shape to use as a stencil in the future.  (5 minutes) 
  • Explain how we are going to experiment with different textures that would be good for making their animal.  Some of the textured paper we will make will need time to dry, but we will eventually trace our animal shapes on that paper and cut them out.  They will also have the chance to draw more detail on top of that texture later.  (2 minutes) 
  • Demonstrate watercolor and plastic wrap. (5 minutes) 
  • Have students paint paper and experiment with plastic wrap.  (remind them to mix a color that matches their animal) (10 minutes)
  • Demonstrate watercolor and salt (5 minutes) 
  • Have students experiment with watercolor and salt.  (remind them to mix a color that matches their animal) (10 minutes)
  • Demonstrate rubbing textures on different parts in the room (walls, carpet, backpacks, bottom of shoes, etc.)  (5 minutes) 
  • Have students explore the room looking for textures that match their animal.  (remind them to use a crayon that matches their animals color) (10 minutes)
  • Once students find a texture they like, have them do it again with a white crayon or oil pastel.  Then demonstrate how to brush watercolor on top.  (5 minutes)
  • Have students practice on their own.  (10 minutes) 
  • With the crayon rubbings, have students trace their shapes on top and cut the animals out.  Demonstrate first.  (5 minutes)
  • Have students do it on their own.  (5 minutes)
  • Paper clip cut out shapes to a paper and save for next week.  (3 minutes) 
Day 2
  • Demonstrate how students can take their dried watercolor paper and trace their animal shape on top and cut them out.  (5 minutes)
  • Have students do it with their own paper.  (15 minutes. 
  • Demonstrate how to draw detail on top.  (5 minutes) 
  • Have students add detail to their animal cut outs. (20 minutes) 
  • By the end of the day, students should have a variety of images of the same animal.  Have them choose their favorite and glue it on top of their landscape paintings.  Demonstrate first.  (5 minutes) 
  • Have students cut and glue their animals.  (10 minutes) 

Friday, February 20, 2015

2/20/15


The students finished up their landscapes today and then we talked about animal classification.  We focused on Kingdom, Phylum, and Class that animals are identified by.   


Then we played an eye spy game where they would give clues about the animal they are going to draw for their project.  

Here is the worksheet I gave them to use when giving I spy clues:


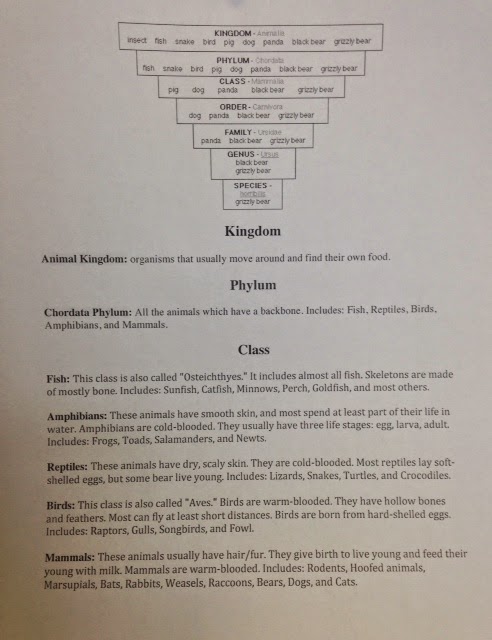
On the back of this page is a cheat sheet to help them remember how to classify the animals.  


When guessing their partners animal, they were given this sheet to help them narrow down their guesses.  


The kids had a lot of fun guessing each others animals and I think the activity really helped them solidify what they had learned.  

Now that the students know how to classify their animals, they are going to focus on drawing them.  They read over their animal's descriptions again and highlighted the physical characteristics.  For the next few days we are going make multiple cutouts of their animals using different textures.  Today we went on a texture scavenger hunt in the room by rubbing crayons and paper on different surfaces.  The students will eventually use these to cut out their animal and draw on top of them. 


Friday, February 13, 2015

2/6/15

Today the students finished up their landscapes by painting over their drawings with watercolor.  Because of the spelling bee, we were a little short on time and a lot of students weren’t able to finish.  Before painting, I talked to them for a little about the Hudson River School art movement and showed a few examples of American Landscape painting.  We talked a little bit about the motives behind painting these and discussed themes such as the sublime, exploration, and settlement.  The students had some insightful comments and observations.  I pointed out some of the perspective techniques in the paintings to help the students apply those skills to their own paintings. 

Among the Sierra Nevada Mountains, California by Albert Bierstadt (1868)

Here's how some of their paintings turned out:


1/30/15

Mrs. Gandara’s class has been studying Utah wildlife and environments. I printed out a variety of Utah animals with a description of what they look like, their environment, and how they behave.  The students got to choose which animal they wanted to learn about and they were asked to read the description and highlight any sentence that described the environment that their animal lives in.  Then we reviewed different types Utah Environments such as Deserts, Forests, and Wetlands.  I was impressed with how much the students knew. 
Today the students were assigned to draw a landscape of an environment that their animal belongs in.  I asked them to specifically include plants that would be found in their environment.  I showed a few examples of specific plants that are found in Utah for Deserts, Forests, and Wetlands.  I just focused on the ones mentioned in the 4th grade science standards. 

I reviewed some of the landscape drawing techniques that we had been over a few weeks ago and walked them through drawing horizon lines, object placement, scale, and some coloring techniques.  We just used colored pencils and crayons today, but they will add watercolor to their landscapes next week. 


Utah Landscapes

Subject Concepts
Art Concepts
Content Covered:
Reading Informational Text
Describing Utah environments

Content Covered:
Perspective drawing
State Standards & Objectives (USOE/UEN):

Reading: Informational Text Standard 1

Refer to details and examples in a text when explaining what the text says explicitly and when drawing inferences from the text.

Reading: Informational Text Standard 3

Explain events, procedures, ideas, or concepts in a historical, scientific, or technical text, including what happened and why, based on specific information in the text.
Science Standard 5, Objective 1
b. Describe Utah's wetlands (e.g., river, lake, stream, and marsh areas where water is a major feature of the environment) forests (e.g., oak, pine, aspen, juniper areas where trees are a major feature of the environment), and deserts (e.g., areas where the lack of water provided an environment where plants needing little water are a major feature of the environment).
e. create models of wetlands, forests, and deserts. 
Objective 2
a. Identify common plants and animals that inhabit Utah's forests, wetlands, and deserts.

State Standards & Objectives (USOE/UEN):

Visual Arts Standard 2,Objective 1

a.      Discuss how height placement creates an illusion of depth in artworks. 
d.     Identify evidence of depth, shadow, color, and mood in artwork. 

Objective 2

a. Draw the base of a distant object higher up on the drawing page than the bases of objects that are meant to be in the foreground. 
Learning Outcomes:
·       The student will be able to read informational text and pick out information about a specific animal’s environment. 
·      The student will be able to describe Utah’s wetlands, forests, and deserts. 
·      The students will be able to identify common plants and animals that inhabit Utah. 
·      The student will be able to refer to the details and examples of a specific environment given in informational text and translate that information into a visual depiction. 
Learning Outcomes:
·            The student will be able to draw a landscape using perspective techniques such as creating depth through height placement, shading, and the location of objects within the page. 

Lesson Plan

Objectives:
This lesson will give students the opportunity to study informational text and learn about Utah wildlife.  Students will visually translate what they have learned by drawing a landscape utilizing different perspective techniques. 

Assessment:
·       Student’s animal handouts can be assessed to see if they have properly highlighted descriptions of the environment. 
·       Drawings can be assessed to see if successfully utilize perspective techniques.  


Materials Needed:
  • Pencils
  • Paper
  • Colored pencils or crayons
  • Watercolors

Vocabulary
  • Wetland
  • Forest
  • Desert
  • Sagebrush
  • pinyon pine
  • Utah juniper
  • Spruce
  • Fir
  • oak brush
  • quaking aspen
  • cottonwood
  • cattail
  • bulrush
  • prickly pear cactus

Lesson Sequence:
  • Take turns have students pick out animal worksheets.  Give instructions to highlight parts of text that describe the environment their animal lives in.  Have them circle if it has the words forest, wetland, or deserts.  (15 minutes)
  • Go over wetlands, forests, deserts, and the plants that inhabit them (10 minutes)
  • Hand out paper and have students get ready to draw with pencil (2 minutes)
  • Review horizon lines and demonstrate drawing one on paper.  Have students follow (5 minutes)
  • Explain that we are going to draw the plants described in our animal’s environment.  If the text doesn’t specify, then use information to guess if it’s a forest, wetland, or desert and choose one of the plants we talked about that belongs in that environment. (pull up slide that includes all plants)  Give an example of perspective (what is in front is bigger, what is in back is smaller). Have them choose one plant from their environments (something simple) and draw it three times on their paper. Demonstrate on your paper and then have students draw their own.  (20 minutes)
  • Once they have finished drawing at least one plant 3 times, tell them to add any elements they think are appropriate (water to the wetlands, maybe a river in the forest, dots of sand or a road in the desert). Demonstrate on paper. (15 minutes)
  • Once the pencil drawings are complete, demonstrate how to add color with colored pencils.  Review shading with complementary colors. Have students finish coloring the plants and objects in their landscape.  Explain that they don’t need to color in the ground or sky because we will be painting that in later.  (15 minutes)
  • Review Aerial perspective, tints, and shades by showing examples of mountains and demonstrate painting mountains with watercolor.  Show them how to paint in the rest of their landscapes. (10 minutes)
  • Give students time to paint over their drawings with watercolor. (30 minutes)

Visit: http://www.uen.org/core/ to find UEN/USOE standards.